Showing posts with label Crafts. Show all posts

Saturday, September 15, 2012

Baby Boy Bedroom

Since I'm using this to remember what life was like "back in the day," I thought I would post about W's room. Once we knew we were having a boy, we ditched any gender neutral ideas we had. Daddy was a baseball player, so I threw out the idea of doing vintage baseball. He was totally on board :) We're still looking for a nice dark curtain to replace the oh so lovely blanket on his window...


I know some people love cutesy little character bedding and whatnot, but I am just not a fan. I wanted a room that would grow with him for a little while, so I decided to ditch the normal baby bedding and just make him a quilt. We went with "Americana" type colors... navy, tan, and brick reds. James helped me pick out the fabric and I loved it! I will say, I was a little bummed we couldn't do bright colors for a little girl, but everything turned out so great (in my opinion) that I got over it! I also recovered some cushions on a chair that my grandma gave us awhile back and made a few pillows.


We hung a peg board (FREE - left by the previous owners in our garage) that James painted a soft white. We put his dresser/changing table underneath it since we hung baskets on the peg board for diaper storage. My parents had a lot of vintage baseball decorations that we used. I think they achieved the vintage feel I was going for :)


We also scored some nice shelves on Black Friday at Home Depot (or maybe Lowes??) that we use for toys, books, baskets of socks and hats, and some other decorations. We, of course, have his K-State gear showcased as well! We may be in Sooner county, but we bleed purple!


All in all, I love his room and so does James! It's perfect for the little guy and I think it will grow with him. A lot of the things we got were free that we spruced up with some spray paint so it was pretty economical as well. Gotta love that!

Monday, March 5, 2012

Weeks 30 & 31

Even while I am trying to rest as much as possible before little man makes his grand appearance, we have been so productive in the last few weeks. It makes me so happy! I am definitely nesting because when we're not getting a project done, I'm on Pinterest to find new projects or updating our to-do list (James is starting to hate that list!).

Here's a few projects we've completed recently...

If you remember my tie onesies from last year, I took it one step farther and added a vest. This was a Pinterest find and the original post looked so cute, I had to give it a try! We had a ton of leftover t-shirt fabric so I just used some of that. Cute and cheeeeeap!


I also made some baby legs out of socks that we got on clearance. Seriously, this couldn't be any easier. I think pairing it with the vest onesie would look adorable! Please ignore how dirty my couch looks :)


Another Pinterest find are some baby sandals. I had faux leather on hand from when my dad recovered my headboard when we moved, so this was essentially free. I thought they turned out cute but definitely not perfect :) He won't mind!


Yet another Pinterest inspired project was to hang a peg board over our changing table area (we're attaching a contour changing pad to the dresser) so we could hang some baskets for diapers and whatnot. We're also hanging some of our decorations including those pictures and vintage baseball knick knacks. I am in love with it. I think I'll also add little man's initials.


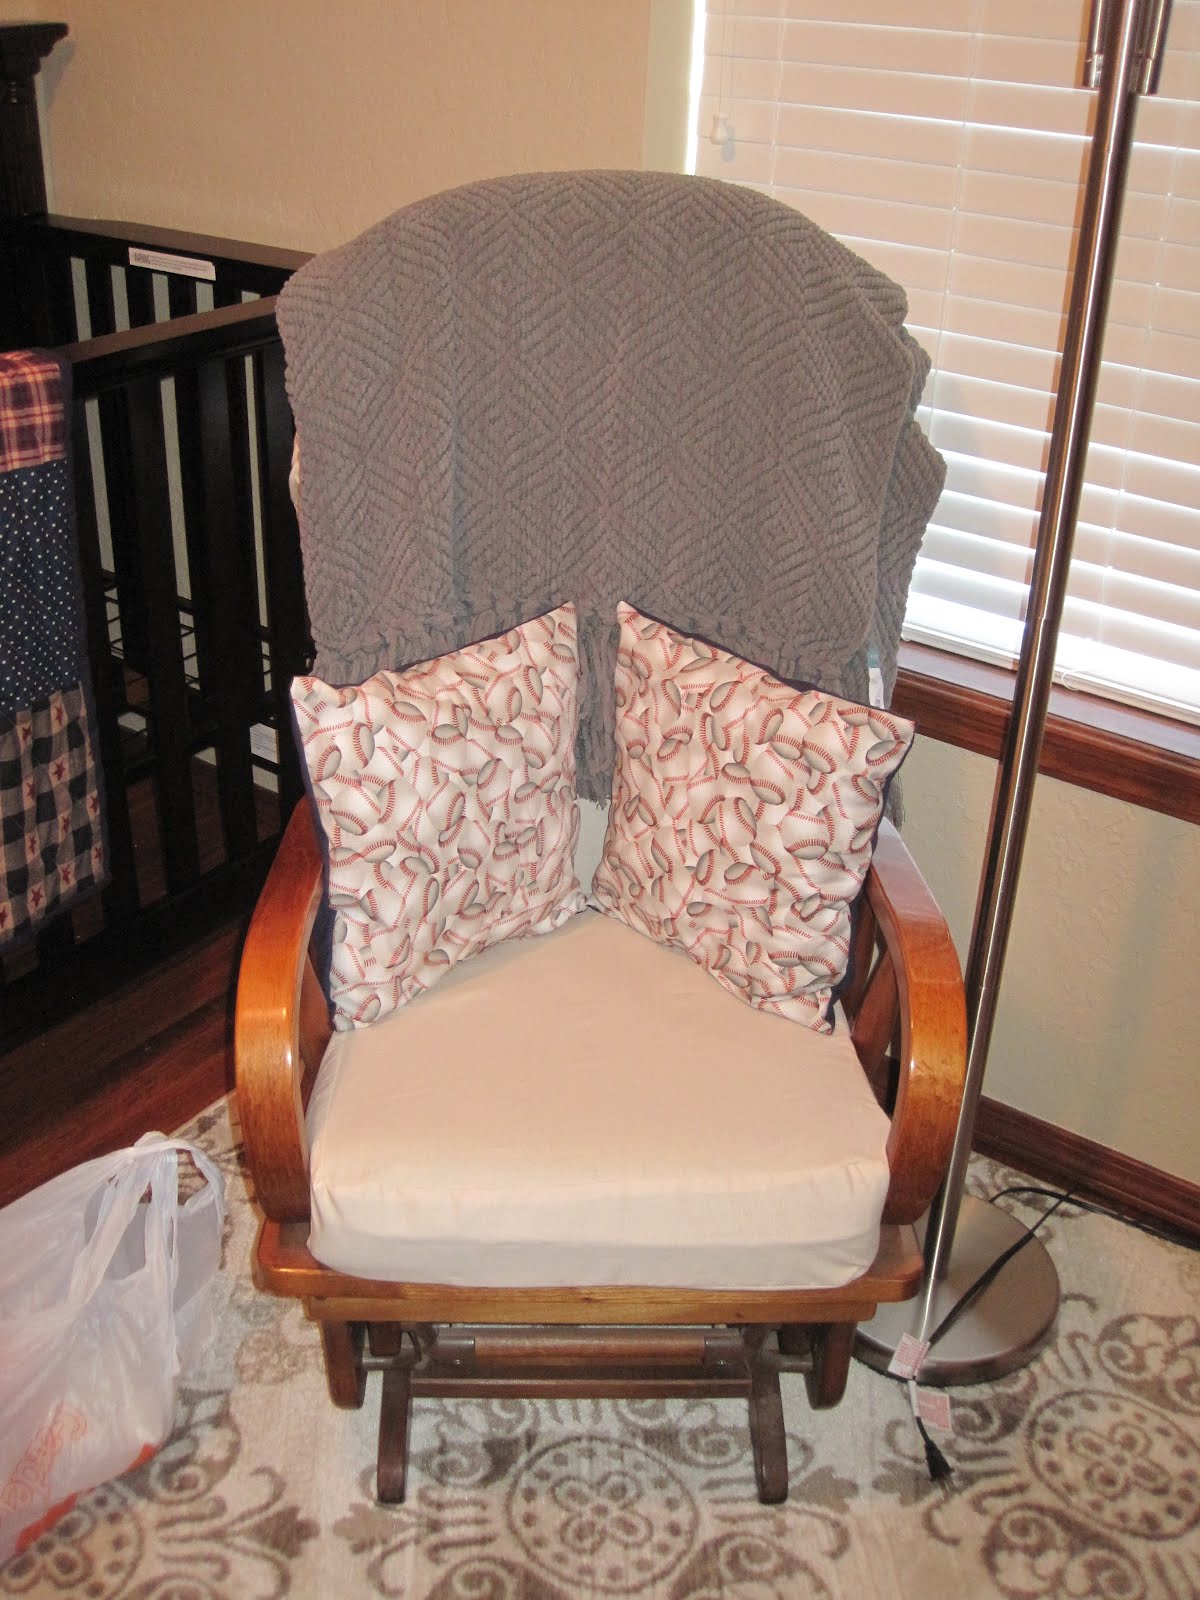
I also recovered the chair cushions in some sale fabric from Hobby Lobby. Love that place! Here is the chair with a blanket on the back. Does it look perfect? No, but that's just fine with me! I also made them removable so I can wash them if need be. You can also see our new rug!


I saw this on Pinterest as well, but it didn't come with a tutorial but it was seriously so easy to wing it! I just used some scrap fabric and elastic. Easy peasy.


One final Pinterest find (can you tell how I spend my time?) was another great way to use scrap fabrics. I used some leftovers from previous projects, the baby's room, and t-shirts. I made 2 of each below, one for me and one for a friend. They were fun and easy to make! James really liked them and thought they looked funky and cool.


On the less crafty note, everything seems to be progressing great! He's measuring 2 weeks ahead but James was a big baby so we expected that. In 2 weeks, I only gained a pound but little man moved ahead 4 weeks in measurement. Big growth spurt! Our first shower is next weekend so we're trying to get as organized as possible before then. So much fun! Here's my 7 month shot from a week or so ago.


And here is one of my favorite shots from our maternity session a few weeks ago. Seriously, Deisy did such a good job!

Saturday, February 4, 2012

Weeks 26 & 27

I officially hit the six month mark in week 26. I can't believe it! Only 3 more months (at max!) before we meet our sweet boy! Things are starting to fall into place in his room and it makes it all the more real.

James' parents brought down his furniture since it was delivered to a store closer to them and they got it all set up in his room. He definitely has nicer furniture than we do but we're not complaining at all. Thanks to both sets of grandparents for the awesome Christmas gift (crib and dresser). Baby boy and us love it!

Please ignore the fabric on the chair. My grandma gave us this chair a long time ago and we've been waiting to replace the cushion (or recover it) until we knew what color we wanted to go with. We're thinking cream or a light tan but it's still up in the air. The two pillows on the chair were craft projects I made on the fly today. I made them with a pocket back so we can easily slip them off and wash them if anything... ummm... gross were to happen to them :)

We're putting a peg board over the dresser to hang some baskets and other decorations from. Here's a look at some of the decor for the room that's waiting for it's rightful place.

We're also hanging his name over the crib and a few other vintage baseball pictures that my Dad saved for us (Mickey Mantle, Joe Dimaggio, etc.). I made two collages out of some of James' baseball cards and put them in 5x7 frames that are up on the shelves and we've bought a few other baseball items.

I think I'm in the nesting mode. I spent most of this afternoon doing sewing projects. I made my boot cut maternity jeans into skinny jeans using this tutorial. I think they turned out really well and I'm glad I can easily fit them into my boots now! I also made the pillows and fancied up a plain onesie with the little man's name (so that won't be on the blog for awhile!). I also feel like I constantly want to clean everything around me. We just bought an air purifier so I'm hoping that cuts down on my urge to dust every day.

Anyways, here's my 6 month pregnancy shot. Getting bigger and bigger everyday!

Sunday, August 21, 2011

Sewing Projects

I went to another baby shower yesterday (I seriously know so many babies/pregnant ladies this year!) so I thought I would whip something up with my handy dandy sewing machine. I've been trying to make gifts lately 1) to make something truly personalized and 2) to save a little moola without sacrificing the cute factor :).

I decided I would make some cute little shoes and a pillow-case dress that can be worn as a little tank once the baby gets bigger.

First things first, I needed to get some fabric. Hobby Lobby, my favorite place, was having a 30% off sale for their fabric so it was the perfect place to pick some up. I had planned on picking some up that weekend but the hubby was off (it was the week before school started) and he offered to go pick some out for me. Seriously, I love that man! I told him I wanted something with aqua in it since the baby's room was aqua (and super adorable!). He called me while I was at work because he saw two different patterns and described them in detail for me, haha! He ended up finding some coordinating ribbon for one, so we went with that.

I used this pattern for the shoes and I thought they turned out super cute. It wasn't terribly hard to follow. I have an old machine and my thread got jammed once but that was the only problem I had. I then used this pattern for a simple pillowcase dress. It was so easy!

The finished product:
Can't wait to meet baby D! She's going to be one gorgeous and Godly girl! How's that for alliteration???


Linking up to Frugal Friday and Show And Share Day

Sunday, August 7, 2011

You've Got Mail

James and I have a huge problem with mail piling up in our "catch-all" basket that sits on our counter. It started becoming an eye-sore and driving me nuts so I went looking for a mail sorter. But the ones that I liked were $20 and up... not terribly expensive but more than I wanted to spend. I knew I could make something for much cheaper so I looked around the house for supplies. I had wall hangings in my kitchen that I was planning on taking down - they're hanging where I'm putting my chalkboard dish and the colors did not match our kitchen anymore. I bought two of these for I think $5 each at Wal-Mart back in college. They're very cute, but just don't go in our place. I decided to use one for my project. They're the perfect width and height and already had a way to hang them on the back!
After I painted a few coats of white paint I had on hand to make a blank slate, I attached some fabric to the wood. I put modge podge on the front, placed the fabric on and smoothed out the wrinkles, then flipped it over and hot glued it on the back and put some modge podge over the edges in case it frayed. I also needed something to fashion pockets to hold the mail, so I grabbed some matboard and cut out 2 squares (same width as board and I made mine 6 inches tall), then 4 triangles (3 inches wide and 6 inches tall) to make two little pockets. I hotglued them together. They don't look perfect but I was covering them anyways!I then covered them in the same fabric with modge podge and hot glue again. The inside doesn't look awesome, but you can't see the seams too much and it's the INSIDE and no one can see it! I then hotglued the pockets to the board. I plan on adding two little labels for MAIL IN and MAIL OUT so we can keep things organized. The total cost on this was $0 since I had the board and matboard from previous decorating and the fabric was from my stash - and even if I had to add the cost of the fabric, it was a fat quarter for 50% off at HL that ended up costing about 3$. Not too shabby!I still have another board and matboard left so maybe I'll make another to put bathroom stuff in. Or I can just paint the board and cover with fabric that actually matches the house and call it good.

Linking up to Frugal Friday and Show And Share Day

Chalkboard Paint

So there's this awesome stuff called chalkboard paint. Oh you mean you've heard of it? Okay, so I know that chalkboard paint has been all the rage in the DIY world for awhile now, but I just recently finished my first project with it. I've been wanting to do this for awhile but last year I couldn't find just a small, cheap tube of it, only pints, and since I didn't want to paint a huge space, I've been putting it off.

James had a week off before he went back to school this week and nicely went to Hobby Lobby for me and found a little bottle that would cover 10 square feet at most and was only $4, so he picked it up for me. I had an old metal serving plate my friend had given me for a DIY project of my choosing (Thanks, Paigey!) sitting in my cabinet. I decided it would be really cute, painted and hung up on the wall. We have a ton of paint samples in our utility room, so I went and scanned them to see what I wanted. We have a ton of white options (did you know how hard it is to match ceiling paint?!?!?!) so I grabbed one of those.

I painted a thin coat and let it set, then attempted a second coat but it was flaking off and just not covering well. James informed me that the paint I was using would not work well on metal. Bummer... But he had an awesome idea - he had painted our shed last summer and used a white paint for the trim work. It was a durable outdoor paint that would adhere to metal. PERFECT! I painted a few coats on the dish and it seemed to be working great! I then painted 3 coats of chalkboard paint on the middle of the dish and waited the requested 24 hours for the paint to cure. All I had to do after that was rub a light coat of chalk over the area and then wipe clean. Now it's perfect for little notes, bible verses, or even grocery lists!
After this picture, I hotglued some wire to the chalk and hung it on one of the handles for easy access. James is figuring out the best way to hang it, so for now it's sitting on our table. I want it to be easy to take down and put back up so I can write messages on it without too much trouble so I think we'll hang it under the handles. I'll update when it's up!

Linking up to Frugal Friday and Show And Share Day

Decorating on a Dime

Since we're a one-income fam until the hubs get out of med school, I've made it a personal goal to really design on a small budget. We've got a ton of things that we each had before we were married and that we have received as gifts, but I do try to mix things up a bit every now and then to keep our decor fresh. For this reason, I hit up Goodwill every now and then, buy things on clearance, and try new DIY ideas with stuff I have laying around.

I've seriously been crafting all weekend and need to blog on some of those ideas, but I just realized I never blogged about a craft I did months ago that I love. I saw this on one of my many craft blog searches, and I fell in love! I knew I had almost all the supplies around the house and gave it a try. I actually had some of the wire but couldn't find it (cue an organization of my craft closet!) so the hubs nicely went and bought me some. He had also just trimmed our tree and patiently waited while I picked out which branches I wanted trimmed down for the project. What a guy! I then used scrapbook paper I had picked up to coordinate with our living room and cut out 3 sizes of leaves. I then glued the leaves around small pieces of wire and wrapped the wire around the branches. I put them in a vase I had laying around and called it good! I still need to go back and add more leaves (they're even cut out and waiting), but I keep forgetting!It was a really fun project and I completed it pretty quickly! I really like how it spices up that corner of the room!

Linking up to Frugal Friday and Show And Share Day

Sunday, June 26, 2011

Toddler Gift

Another couple in our lifegroup have a little guy who turned one in May. He is the cutest little boy ever! I couldn't make it to his party but made him a little gift that I hope he can use in the future. I've seen a ton of the little crayon rollups so I just winged it and sewed it up pretty quickly. I just took the length of the crayons I bought (Crayola Triangular Crayons) and cut two layers of the outside fabric about an inch and a half taller. I also planned on making pretty wide slots for them since they're big crayons so I made them about 17 inches wide (an inch extra for the seams). For the pocket fabric, I just made it twice as wide as what I wanted it to look like finished, and pressed it in half. I then took 1 of the outside layers and the pocket fabric and sewed the little slots (as straight as I possibly could). Then I just sewed everything together (right sides in, including very thin batting) leaving a small gap to turn things right sides out. After pushing all the corners out with a skewer, I did a 1/2 inch top stitch to finish things up and also stitched a small ribbon on to tie the roll up.
My friend said her little boy is still trying to eat the crayons but he'll hopefully grow into the gift!


Linking up to Frugal Friday, Free for All, and Show and Share.

Tuesday, April 27, 2010

We're Almost Outta Here!

So, I took quite the break. I pretty much figured out the life of a married college student is not so exciting and very, VERY busy, but that is soon coming to a close! Only a few more weeks until my final graduation. Crazy! Anyways, we're heading to Oklahoma to sign the papers for our HOUSE! I'm so excited! I might chronicle a few of our attempts to fix up the house on this blog. We shall see how it goes....

Anyways, my dear friend's little boy turned 1 year old this month! I remember the day he was born and he's such a big, handsome boy now! To be a little creative, I decided I would make his gift. I saw a great tutorial on a different blog for customized baby blocks and I really wish I could remember the name of it.

Here is basically what I did. I used some of my leftover scrapbooking paper and bought some wooden blocks and stickers at my favorite place, Hobby Lobby!
After I had all my supplies, I used the blocks to trace out the correct size of paper I would be needing.On a few of the planned sides, I added stickers to the scrapbook paper.
Then I used my trusty modge podge to adhere them to the wooden blocks. I think if I were to do these again, I wouldn't modge podge the top necessarily, but you live and learn. It turned out fine, just a little harder to work with.
Once all the paper was glued to the blocks, I sandpapered down the edges so they were rounded off. This makes it more safe for the little kiddos and also gives it a nice well-used look. I planned out a different theme for each side: his name, numbers, different colors, animals, different patterns, and a picture of the cutie-pie.
I also sprayed some sealant on them so the modge podge wouldn't get soggy later on if water was spilled on it. This also took away some of the glossiness of the pictures. Overall, I was very happy with how they turned out and he seemed to like them when he opened them. He immediately screamed with happiness and threw them! Hahaha, he really enjoyed that part.

I'm linking this up to A Soft Place to Land's DIY Day.